
Annnnnnd…I'm back. It took some time to get life under control and in a comfortable place to start sharing again, but we are almost there. May couldn't seem farther in the past -- with finishing my thesis, closing on our house, vacationing, graduating, starting a new job, losing some very important people and settling into our new city, filling our days since the spring. I am excited to be here and more excited about having a routine and time to work on my projects in the kitchen and around the house. We have gotten a good start on furnishing and organizing our spaces, but I will keep you in suspense as to our complete context as I share small projects around the house. Small projects are certainly filling our evenings and weekends, but each one makes the house feel more complete. And I have the long awaited opportunity to live Pinterest -- for real!
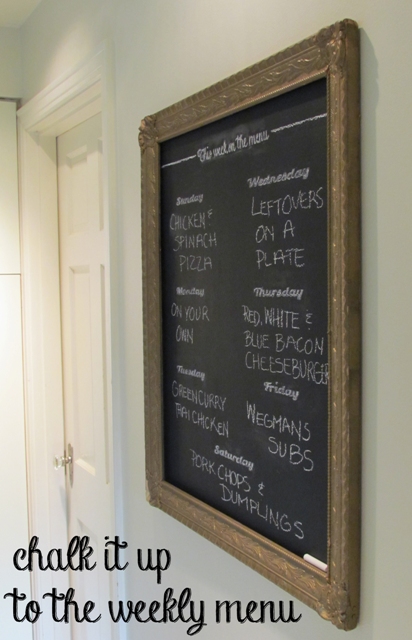
Everyone brings character to their home differently and are trying to make our house comfortable for day to day living and special occasions. We recently completed as easy chalkboard wall in our kitchen that will serve practical purposes weekly, but also allow us to write fun messages throughout the year. This project was great for [impatient] me because it was quick and made a great difference in the feel of our small, white kitchen.
Everyone brings character to their home differently and are trying to make our house comfortable for day to day living and special occasions. We recently completed as easy chalkboard wall in our kitchen that will serve practical purposes weekly, but also allow us to write fun messages throughout the year. This project was great for [impatient] me because it was quick and made a great difference in the feel of our small, white kitchen.
Here's what you'll need…
Sponge and gentle cleanser
Painter's tape
Chalkboard Paint
Frame
Level
2-3 tack nails
Hammer
Pencil
Paintbrush
Let's get started…
Sponge and gentle cleanser
Painter's tape
Chalkboard Paint
Frame
Level
2-3 tack nails
Hammer
Pencil
Paintbrush
Let's get started…
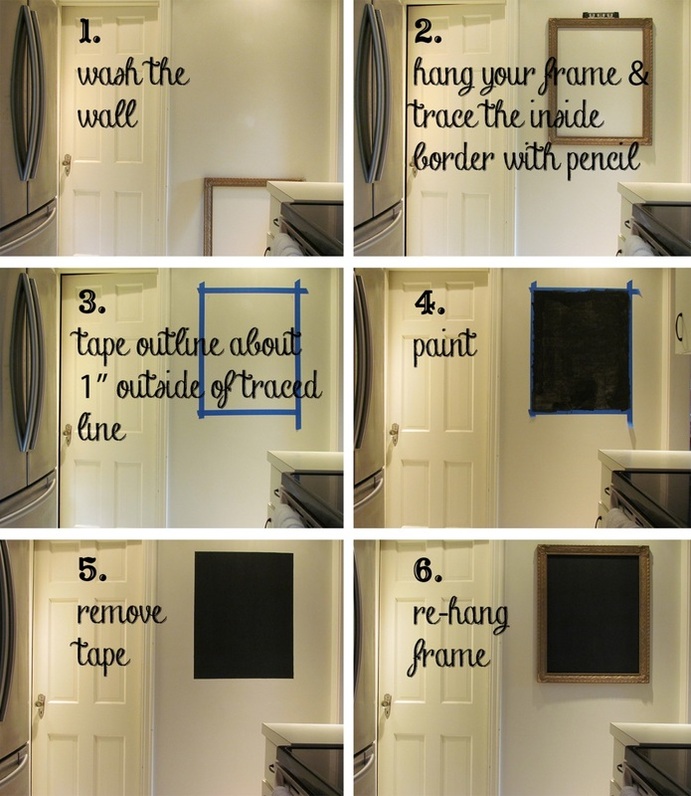
1. Wash your wall and let it dry before you get started on the painting.
2. Hang your frame using your level and tack nails. I hung the frame so that it can be easily removed and re-hung. It will be more convenient to clean the chalk wall if the frame can be removed. While your frame is on the wall, trace the inside lightly with pencil.
3. Remove the frame and nails. Then, tape around a your traced line. I left about 1.5" inches in excess of the traced line.
4. Begin with your first coat and paint the space as directed on your selected paint.
5. After the paint is sufficiently dry, carefully remove your tape.
6. Replace your tacks and frame.
I traced some lettering using my favorite fonts to give my board content the decorative look I was going for -- but the wall may be a place to doodle in your house or to take down the shopping list as things come up.
Things in our new city have been good, but I am definitely taking my time to adjust. With new people, experiences, and "stuff" coming our way, I am making every effort to chalk it all up to the weekly menu. The new will soon become comfortable if I take it in stride and with the confidence that I know I have inside.
Being a way for awhile, you haven't heard too much from me, but I haven't heard too much from you either. Let me know if there are new recipes or projects you are trying or if you have ideas for me to explore.