themostcolorfulone
  • Blog
  • Recipe Index
  • Idea Index
  • contact

The Re-Purpose Driven Life

7/28/2013

Comments

 
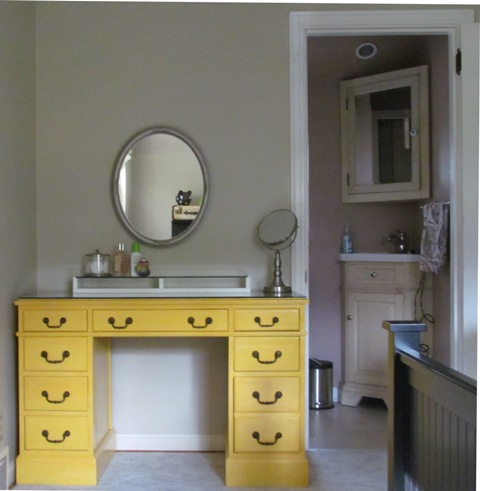
We have so many bathrooms in this house -- but no counter space. Project! We created some counter space for my makeup and hair products using an old desk. It's the vanity that every little girl dreams of, with an extra pop of color. We were lucky to have a desk that was left behind when we moved into this house, but they are pretty easy to come by at estate and yard sales. 
Picture
Picture
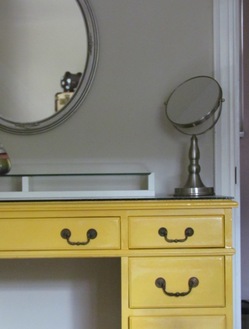
When it comes to getting the color you are looking for -- make sure to sand and prime properly. I also used a topcoat of polyurethane to add some shine. To bring in other colors from the room, top the desk with a bold, patterned fabric. Keep the fabric in place with a glass desk protector. I found the mirror at a yard sale, but am still on the hunt for the perfect chair or stool to finish off the set.
Picture
Picture
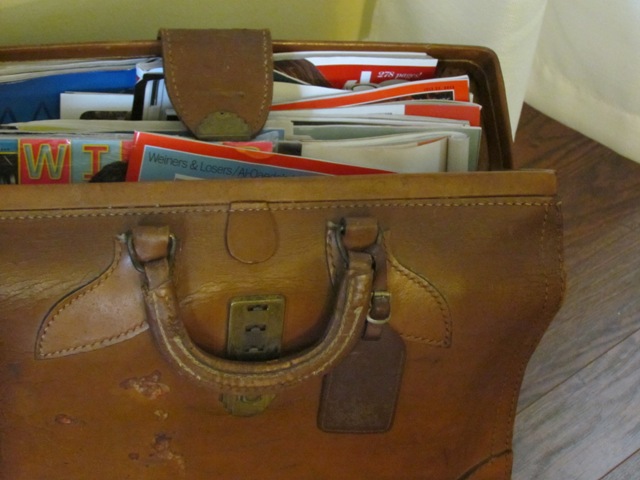
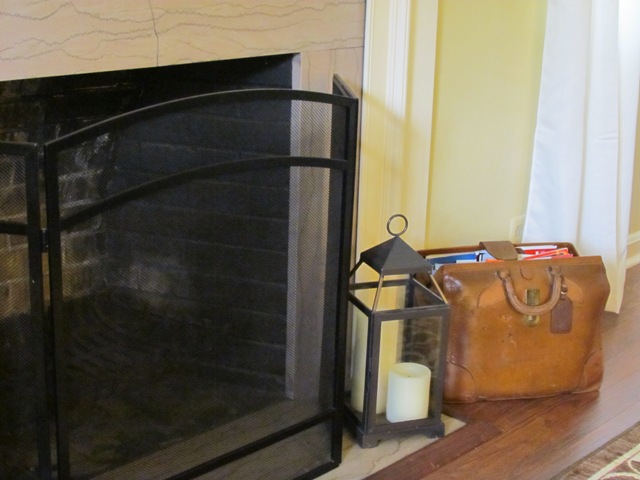
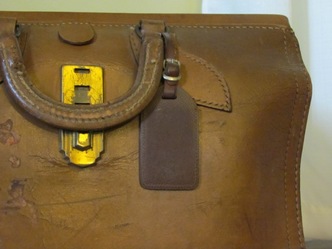
Post-grad weekends are for...estate sale shopping. Among the dishes and bright yellow ice bucket I picked up this Saturday morning, I also snagged this great leather briefcase for $5. It has found a home as a magazine rack as part of our fireplace composition. Meant to be portable, it can be carried away to bedside or sofa-side for easy reading access.
Picture
Picture
Unique pieces like the desk vanity and our briefcase storage are the elements that bring character to rooms filled with Pier1 and Target furnishings.
Picture
Picture
Comments

Red & Yellow Homemade Ketchup

7/19/2013

Comments

 
Picture
I have had ketchup on the brain for several weeks now -- moving to Pittsburgh, the land of Heinz, 4th of July cookouts, NPR stories about homemade ketchup -- it's everywhere. So I decided to join in the madness for myself by making two ketchup varieties (in one evening after work). I started with Joy the Baker's latest ketchup recipe and a yellow ketchup by Jamie Oliver to adapt into my versions of the everyday condiment. There was some lingering skepticism about the point of making ketchup that could be more easily (and economically) purchased in a bottle before I got to stewing. But, the results were different from the 57 varieties of Heinz; so I think it was worth it.
Picture
Ketchup has base ingredients of sugar, tomatoes, and vinegar. Varying flavors are left to the maker via vegetables, sweeteners, and spice blends. The varieties I tried were a sweet and tangy yellow, along with a mildly spicy red.
Picture
I did not prepare these with canning in mind, but the recipes yield enough to jar and store for up to six months. Before we dive in, I will note that the yellow ketchup recipe beckons for a strong food processor. My hand-me-down processor struggled, so I yielded less ketchup, but I did find a use for the leftover blends -- more on that later. Also, don't try to prepare these simultaneously, it is a pain. Instead, schedule this into a Sunday after noon activity (a rainy one, if possible).
Picture
Let's start with the yellow ketchup. Here's what you'll need...
1 large red onion, peeled and roughly chopped
1 stick celery, trimmed and roughly chopped
Olive oil
1 tablespoon ginger
4 tablespoons minced garlic
1 tablespoon chili powder
Bunch fresh basil, leaves picked, stalks chopped
1 tablespoon coriander seeds
1 tablespoon cloves
1 teaspoon salt
1 teaspoon ground black pepper
2 lbs yellow tomatoes chopped
3/4 cup red wine vinegar
1/3 cup soft brown sugar

Let's get started...

1. Chop your onion, celery and basil. Combine with spices, garlic, and olive oil. Cook over medium high heat until vegetables are soft.
Picture
2. While the vegetables are cooking, slice your tomatoes into wedges. When the vegetables are soft, add tomatoes and 3/4 cup water.
Picture
3. Cook tomatoes with vegetable and spice blend until reduced by half.

4. Set aside to cool for a few moments while you prepare your processing lineup.

5. Set up your processor and a bowl with strainer.

6. In 1 to 1-1/2 cup quantities, process the tomatoes mixture until smooth. Press through strainer to end with thick yellow base.
Picture
7. Once all batches are strained, return thick yellow base to clean sauce pan.

8. Stir in vinegar and sugar and cook over medium heat until thickened to desired consistency.

9. Allocate to containers and refrigerate until ready to use.

Hold onto the leftover pulp that your processor may not have smoothed through.

And now some red ketchup; here's what you'll need...

2 tablespoons olive oil
1 medium onion, chopped
1 tablespoon minced garlic
1 heaping tablespoon tomato paste
1 teaspoon salt
1 teaspoon ground mustard
1/2 teaspoon smokey paprika
big pinch ground cloves
1/4 teaspoon ground allspice
1 tablespoon crushed red pepper flakes
1 28-ounce can crushed tomatoes with juice
1/2 cup brown sugar
1/4 cup apple cider vinegar

Let's get going...

1. Bring your spice blends, garlic and and onions to transparency over medium high heat with olive oil.

2. Coat onions and spices with tomato paste.

3. Add tomatoes, sugar, and vinegar and simmer over medium heat for about 15 minutes.

4. Repeat processing in batches as directed for yellow ketchup above. The processing result is the final product.

5. After processing, allocate to containers and refrigerate until ready to use.

I some of the leftover pulps from both recipes as the spice blends for the meatloaf I served with the ketchup. The remainder I wrapped in wax paper and stored in the freezer to be used in future marinades.
Picture
To most appropriately taste test our ketchups, I cubed a basic meatloaf and we shared a dipping platter with cabbage and noodles on the side. It definitely made for a comfortable dinner experience and would work as a fun hors d'ouevres setup as well. Throw the ketchup on eggs, a hot dog, hamburger, or whatever summer sends your way!
Comments

B-a-n-a-n-a-s

7/12/2013

Comments

 
Picture
Are you heading to a summer picnic or party and looking for a dessert recipe? Or are you trying to find a new bread pairing for a summer salad? One word, bananas. Bananas are tropical, so a summertime banana bread feels natural, right? I came across this recipe for banana bread that uses peanut butter instead of butter or margarine. Second word, same as the first, bananas -- but this time I mean this idea is bananas (great)!

 I still haven't come up with optimal space coordinating when it comes to putting together the photos for recipes in our new house, so bear with me.

Here's what you'll need…

1 cup brown sugar
2/3 cup creamy peanut butter
2 egg whites
1 1/2 cups mashed banana
1/3 cup non-fat yogurt (I used cottage cheese -- whatever you have)
1 teaspoon vanilla
1 2/3 cup "white" whole wheat flour
1 teaspoon baking soda
1/4 teaspoon baking powder
1/4 teaspoon salt
1/2 cup chopped nuts (optional and recommended)

Let's get started…

1. Preheat the oven to 350 degrees.

Picture
2. Mix your dry ingredients (except the brown sugar) and set aside.

3. Using an electric or hand mixer, whip your brown sugar, peanut butter, egg whites, cottage cheese, vanilla, and bananas until smooth.

4. Fold dry ingredients and continue to mix by hand until thoroughly combined.

Picture
5. Pour into greased loaf pan and bake for 55-70 minutes or until the center is baked through.
Picture
6. Cool thoroughly before slicing.

Keep your fingers crossed that this weekend will prove productive enough to share some more projects around the house.
Comments

Living Pinterest

7/7/2013

Comments

 
Annnnnnd…I'm back. It took some time to get life under control and in a comfortable place to start sharing again, but we are almost there. May couldn't seem farther in the past -- with finishing my thesis, closing on our house, vacationing, graduating, starting a new job, losing some very important people and settling into our new city, filling our days since the spring. I am excited to be here and more excited about having a routine and time to work on my projects in the kitchen and around the house. We have gotten a good start on furnishing and organizing our spaces, but I will keep you in suspense as to our complete context as I share small projects around the house. Small projects are certainly filling our evenings and weekends, but each one makes the house feel more complete. And I have the long awaited opportunity to live Pinterest -- for real!

Everyone brings character to their home differently and are trying to make our house comfortable for day to day living and special occasions. We recently completed as easy chalkboard wall in our kitchen that will serve practical purposes weekly, but also allow us to write fun messages throughout the year. This project was great for [impatient] me because it was quick and made a great difference in the feel of our small, white kitchen.

Picture
Here's what you'll need…

Sponge and gentle cleanser

Painter's tape

Chalkboard Paint

Frame

Level

2-3 tack nails

Hammer

Pencil

Paintbrush

Let's get started…

chalkboard wall step-by-step
1. Wash your wall and let it dry before you get started on the painting.

2. Hang your frame using your level and tack nails. I hung the frame so that it can be easily removed and re-hung. It will be more convenient to clean the chalk wall if the frame can be removed. While your frame is on the wall, trace the inside lightly with pencil.

3. Remove the frame and nails. Then, tape around a your traced line. I left about 1.5" inches in excess of the traced line.

4.  Begin with your first coat and paint the space as directed on your selected paint.

5. After the paint is sufficiently dry, carefully remove your tape.

6. Replace your tacks and frame.

I traced some lettering using my favorite fonts to give my board content the decorative look I was going for -- but the wall may be a place to doodle in your house or to take down the shopping list as things come up.

Things in our new city have been good, but I am definitely taking my time to adjust. With new people, experiences, and "stuff" coming our way, I am making every effort to chalk it all up to the weekly menu. The new will soon become comfortable if I take it in stride and with the confidence that I know I have inside.

Being a way for awhile, you haven't heard too much from me, but I haven't heard too much from you either. Let me know if there are new recipes or projects you are trying or if you have  ideas for me to explore.

Comments

    who : becky yannes.
    where : philadelphia, pa.
    what : making, hosting, sharing.
    Picture
    Picture
    Picture

    Favorites

    This website uses marketing and tracking technologies. Opting out of this will opt you out of all cookies, except for those needed to run the website. Note that some products may not work as well without tracking cookies.

    Opt Out of Cookies


    ADVERTISEMENT

    Post Categories

    All
    Around The House
    Event Planning
    Family
    Holiday Inspirations
    Mixed Bag
    Organizing Ideas
    Recipes
    Thesis Notes
    Travel

    Arhives

    February 2019
    January 2019
    December 2018
    November 2018
    June 2017
    April 2017
    March 2017
    October 2016
    September 2016
    August 2016
    January 2016
    November 2015
    October 2015
    August 2015
    July 2015
    June 2015
    February 2015
    January 2015
    November 2014
    October 2014
    September 2014
    August 2014
    July 2014
    June 2014
    March 2014
    February 2014
    January 2014
    December 2013
    November 2013
    October 2013
    September 2013
    August 2013
    July 2013
    May 2013
    April 2013
    March 2013
    February 2013
    January 2013
    December 2012
    November 2012
    October 2012
    September 2012
    August 2012


    ADVERTISEMENT
Copyright 2019. Designed by Becky Joyce Yannes.
Blog  |  About  |  Contact
  • Blog
  • Recipe Index
  • Idea Index
  • contact